Table of Contents
How do I track a user’s score?
I want to include a LearnBrite space in Articulate Online, what do I need to do?
I don’t want the project to submit the score automatically
Can I insert my own slides in the project?
Uploading to Articulate Online
Publishing to Articulate Online
Recording and visualizing scores in Articulate Online
FAQs
How do I track a user’s score?
If the user’s score depends on a variety of factors, the easiest way to track it is by using ChatMapper (see our guide on tracking a score in ChatMapper).
If the score can be tracked through a simple user interaction, you can trigger the submission through (for example) clicking on an object, see our guide.
I want to include a LearnBrite space in Articulate Online, what do I need to do?
The default export is prepared for this – please follow the “Uploading to Articulate Online” section.
I don’t want the project to submit the score automatically
You can follow the “Uploading to Articulate Online” section almost as-is; the only requirement to deactivate this behaviour is setting the “SubmitScoreWhenReceived” Storyline variable to False before exporting.
Can I insert my own slides in the project?
Absolutely, that is why we provide a project file in the first place 🙂 Slides can be inserted both before and after the ones already included in the project. For instance, you could insert an introductory slide before the first, or a “recap” slide between the first and second.
Uploading to Articulate Online
The recommended way to integrate a LearnBrite space in Articulate Online is to do so through Storyline 360.
Downloading the project file
After creating the space, it will be visible in the list at https://app.learnbrite.com/dashboard. To save the pre-generated Storyline 360 project file,
- Click on the three vertical dots on the right of the space’s title, and then on Export in the menu that appears
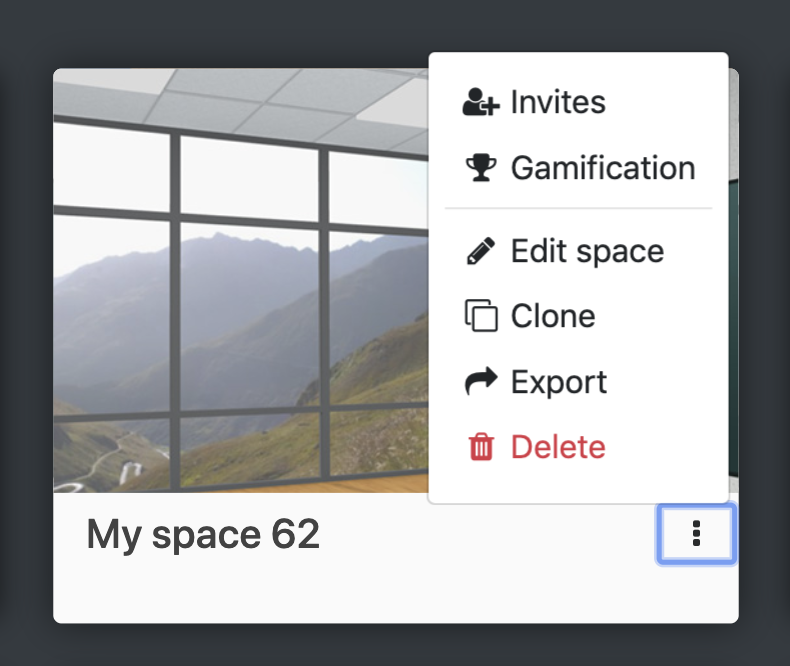
- A number of export options will be shown to you. Expand the Articulate Storyline section by clicking on it.

- Click on the Download project file button in the Articulate Online section to download the file.

You can now open the project in Storyline 360.
Publishing to Articulate Online
The file comes pre-filled with the data needed to communicate between Scenario and Articulate Online – the only required step is publishing the project.
- Click on Publish at the right end of the “Home” tab.

- In the popup, make sure Articulate Online is selected on the left side, then write a name in the Title field
- Click Publish

Wait until the upload has finished, and you’re done – the module will now appear in Articulate Online.
How the .story file works
What follows is an explanation of how the project file works, and of the variables included within.
Slide 1
The first slide includes two elements, an embed and a short survey. The embed is Scenario itself, while the short survey is required to record a score in Articulate Online (see Known limitations).
The first trigger to be activated, which happens when the timeline of the slide starts, executes Javascript that will allow Storyline to listen for messages from Scenario.
When Scenario sends a score back to Storyline, this code will trigger to set two variables: CurrentPoints (to the score submitted by Scenario) and ScoreReceived (to “true”).
The change of ScoreReceived from “false” to “true” will trigger the jump from slide 1 to slide 2.
Slide 2
This slide is a blank Results slide, which is required to submit the collected results (in our case, the answer to the “survey”) to Articulate Online, and a button to submit results manually.
Both triggers in this slide execute Javascript, and are mostly the same:
- If the “SubmitScoreWhenReceived” variable is set to “true”, the trigger that fires when the timeline of this slide starts will submit the score on its own – no action required from the user.
- If the variable is false, then the user will need to submit the results manually. This trigger is bound to the button so that it can be easily copied and pasted, to adapt to different authoring needs.
Variables
- Debug: prints some debug messages to the browser’s developer console when true.
- PassPoints: the score required for a passing grade. When publishing to Articulate Online this is not used, but we include the variable since the project file can be easily exported to other, SCORM-compatible platforms.
- MaxPoints: the maximum score obtainable by the user. As with PassPoints, this variable is unused in Articulate Online.
- CurrentPoints: the score received from Scenario.
- ScoreReceived: this variable is set to True when a score is received from Scenario. Functionally, both this and CurrentPoints can be used as indicators of “a score has been received from Scenario”; the author can choose which they prefer.
- SubmitScoreWhenReceived: when True, this variable will cause the project to submit automatically when a score is received. If this behaviour is undesirable, this variable can be set to False

Recording and visualizing scores in Articulate Online
A score can be recorded in Articulate Online as the answer to a “Short survey”-type interaction.
and then submitting that interaction so that it is recorded when a “Submit results” action is triggered.
Scores recorded this way can be seen in Articulate Online through the following steps:
- Click on the name of the uploaded module after login
- Select “Answer Breakdown: How did people answer?” from the “Report” dropdown

- Click RUN
The answers listed in the page will be the scores received from the space.

Known limitations
A module cannot be set as Passed/Failed based on the score received from Scenario
As Articulate Online does not offer a SCORM interface that can be accessed through Javascript, it is not currently possible to set the Passed/Failed status of a module based on the score received from Scenario.
Scenario does not adapt to screen size after the embed code is changed
Changing the embed code of the space directly in the Storyline project file is unadvisable. Storyline 360 automatically sets the width and height of embedded content to fixed pixel values (e.g. “700px”), which removes its ability to adapt to screen size.
When downloading a project from your Dashboard this is not an issue, as those pixel values are changed to percentage values when generating the file itself, but any change to the embed code will trigger the unwanted behaviour in Storyline again.
