
Jump to:
I’ve added audio files but there’s an error when exporting as ChatMapper Package (CMPKG)
How to direct audio within the 3D environment
How to direct audio through ChatMapper
Speech with text-to-speech – ResponsiveVoice (TTS / Fallback)
How to Make Actors using the Same Voice Sound Different
Using Multiple Languages for One Actor in ChatMapper
Change Voice of Speaking 3D Items
Speech with voiceover audio files (.mp3)
Exporting a screenplay for voice actors
Adding audio files to the experience
Gender-Specific Voice Over Audio Files
FAQs
I’ve added audio files but there’s an error when exporting as ChatMapper Package (CMPKG)
You should make sure that each file is referenced only once. If the same file is referenced in more than one place (for instance an SFX mp3 is referenced in two different nodes), the export will fail. To get around this, you can create a copy of the file for each different time you use it, and give it slightly different names, such as correct_answer.mp3 and correct_answer_2.mp3.
If fixing this doesn’t solve the issue, please refer to other tips in the FAQs document.
Can I autoplay audio?
Yes, see the Autoplay section below.
Types of audio in Scenario
There are 3 different types of audio elements in scenario:
- Speech: Played when an avatar is speaking, synchronized with lips and animation, and managed by LB.audio (voice over audio files) or ResponsiveVoice (Text-To-Speech/Fallback TTS).
- SFX: Multiple can be played at the same time.
- Ambient: Only one can be played at the same time. If you trigger a different ambient sound, it will replace the existing one.
How to direct audio within the 3D environment
Speech with text-to-speech
Text-to-speech within the 3D environment can be triggered using the conversation editor (see “How do I… → Add a conversation to a bot?”
SFX
Sound effects can be played through the playSFX action. As an example, we will trigger a sound when a certain object is clicked; to do so:
- Upload your audio file (e.g. MP3, WAV) to an accessible location such as LearnBrite Storage
- Add the following as the “onclick” field of the chosen object
{"action":"playSFX","url":"<YOUR_AUDIO_URL>"} |
- Click “Save” once you’re done to persist your changes.
Ambient
It is possible to play ambient audio with the playAmbient action. To do so:
- Upload your audio file (e.g. MP3, WAV) to an accessible location such as LearnBrite Storage
- Add the following as the “onstart” field of any object in your scene (a good candidate is the “Environment” object)
{"action":"playAmbient","url":"<YOUR_AUDIO_URL>", "volume":10} |
That’s it! Note that adding this to the onstart field will play the ambient music automatically; if you only want to start it on command, you can add it to the onclick field instead. Additionally, it’s recommended to keep the volume of this music fairly low, as it can otherwise interfere with other activities such as conferencing or dialogue with bots.
How to direct audio through ChatMapper
If you use audio files through ChatMapper, make sure you reference each one only once! If you need to play the same audio in more than one place we suggest making a copy of the file with a similar name, e.g. correct_answer.mp3 and correct_answer2.mp3 |
Speech with text-to-speech – ResponsiveVoice (TTS / Fallback)
The dialog text is played using ResponsiveVoice. The voice can be set up for the avatar using the CAF Voice.
How to Make Actors using the Same Voice Sound Different
This is especially useful if you have two actors using the same Voice and you want them each to sound unique. By playing with pitch and rate values you can create individual voice variations off the default.
You can tweak the voices so actors don't sound identical by using the CAF in ChatMapper
Use the Voice_parameters with format { pitch:1.2, rate:1, volume: 1} or simply {pitch: 1.2}
Pitch (range 0 to 2), rate (range 0 to 1.5), volume (range 0 to 1).
Using Multiple Languages for One Actor in ChatMapper
It is possible to have one actor speak multiple languages. Typically, an Actor’s voice is set in the Assets panel, by changing the “Voice” property (for instance to “UK English Female”).
It is however also possible to change the voice in a dialogue node. To do this you will need to add the custom asset field (CAF) via Project > Project Settings > Custom Asset Fields > Dialogue Nodes > Add New Field (button near the bottom) with
- Title: Voice
- Type: Text
- Default Value: (blank)

Click OK
Now the Voice property will appear when you select any Dialogue Node

Voices and Gender
Be aware that not all voices/languages are available in both male and female versions. Check the list in the widget on https://responsivevoice.com
A player’s voice is based on their chosen avatar gender, by default UK English Female and UK English Male. You can choose different default male and female voices in the Dashboard Space settings. You may also override the player Voice in ChatMapper.
Change Voice of Speaking 3D Items
Conversations can be added to 3D items in a space. The default voice is UK English Male.
The speaking character is "Narrator". Normally to change their voice you'd use ChatMapper, but using the built in Conversation Editor you can add two nodes (one before and one after the sentence) to edit the Narrator's voice for example to be US English Female.
To apply this for to a 3D Item, you should:
- turn on "Advanced mode" in the conversation editor (bottom left corner, you can confirm it's turned on when the box is checked);
- click on "More…" (rightmost in the line of blue buttons)
- select "Script" in the popup (it's in the first column, towards the middle)
- add the script below, then click "Save action"
- LB.cmPlayer.ds.actors.Narrator.Voice="US English Female"
- Rearrange the script node up or down with the arrows (they appear when you select the script node) to be before the spoken sentence
- don't forget to click "Save" to save the conversation!
If you wish to reset the Narrator's voice afterwards, you can do the same and place another script node after the spoken sentence; the script in this second case should be LB.cmPlayer.ds.actors.Narrator.Voice="UK English Male"
Multilingual Localization
You can create scenarios and translate them into multiple languages. Allowing a user to plan a scenario in their chosen language.
To add multiple languages, 2 new CAFs need to be added to the project for each language.
Example: We want to add Spanish localization.
- We add the new field of type Localization named “es” to the dialogue node.
- We add the new field of type Text named “Voice_es” to the actor.
Then we set Voice_es to the corresponding voice, for example “Spanish Female”. And we use the field “es” to add the text we want the avatar to speak when the spanish localization is selected.
For French, the fields would be called fr and Voice_fr.
Speech with voiceover audio files (.mp3)
The platform also supports the use of audio files instead of text-to-speech, which allows employing voice actors for the highest quality delivery. As recorded audio cannot be easily changed, it is recommended to finalize the script with TTS first, and only then to record audio.
Exporting a screenplay for voice actors
Exporting a screenplay works like other exports, by clicking on File > Export > Screenplay as RTF.
Note that the screenplay IDs will not be the same as IDs of ChatMapper nodes: a section at the end of the screenplay called “Dialogue ID Conversions” contains all mappings, for example [3] => 6 means recording [3] is associated with node 6.
This is done because otherwise any changes in ChatMapper structure might completely change the references in the screenplay as well (even if, for instance, you added an empty node), which in turn would make it nearly impossible to keep a consistent set of references for audio files.
Adding audio files to the experience
To add a file, click on Add New File under the “Audio files” header. An input field will appear, and the file path can be written within. Alternatively (and more easily), an audio file can be added by clicking on the button with three dots, which will open the system’s default file selector.
Note that audio files, like other resources, should be in the same folder as the CMP file or in a sub-folder. |

If the node has multiple sentences (Separated using the pipe symbol ‘|’), one file must be added for each sentence (don’t worry about adding them in the correct order – that can be changed from within ChatMapper by using the small arrows on the right of the file path). Here is the same node as before, with a couple of files added

Multilingual Localization
In this case we need to do something similar to the previously mentioned method. We assume the conversation has the CAF named after the language (for Spanish we need to add the CAF of type Localization named “es” to the dialogue node).
We also assume the voiceovers are already configured in the nodes for our main language, using the `audio files` field.
Since we are adding the spanish language (named “es”), we need to add a new CAF of type Files called audio_speech_es to the dialogue node. Then we add the corresponding voiceover audio files matching what we already did for our main language.
Gender-Specific Voice Over Audio Files
For this to work, the male and female audio files will need to have the same name (and must therefore be placed in different folders). For example:
- node01.mp3 <= for male voice
- female/node01.mp3 <= for female voice
We add a new CAF of type Text named audio_speech_urlPrefix to the actor. This value will be prefixed to the “Audio Files” path to create a new path. For instance, if the audio file referenced is “node01.mp3” and audio_speech_urlPrefix is “female/”, the new path will be the “sum” of the two, i.e. “female/node01.mp3”.
To explain in another way, here is how the platform thinks about audio_speech_urlPrefix:
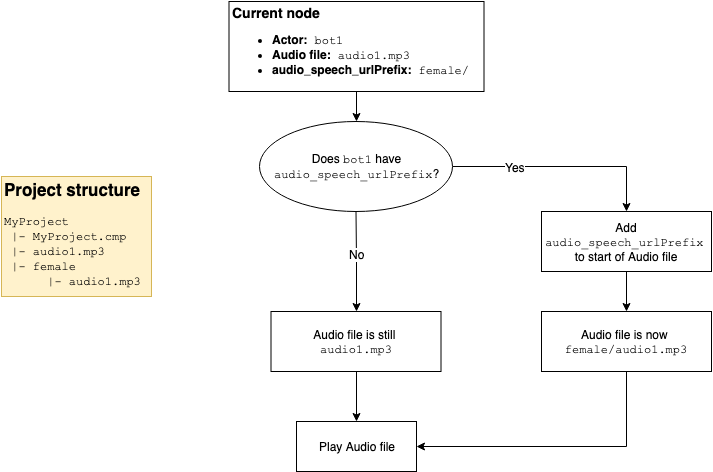
If it is set for a certain actor, prefix its value to any audio file spoken by that actor. Otherwise, just play the audio file as it is set for that node.
To automatically switch between the two values, you can add a small script to the beginning of your conversation, and change the first two variables.
var malePrefix = "MALE_FOLDER_PREFIX"; |
So for example, if you have the same structure as in the flowchart (with female audio being in the female/ subfolder) you would add this snippet:
var malePrefix = ""; |
As a final example, let’s organize the files in two different folders:
- Male voiceover files are in VO_m
- Female voiceover files are in VO_f
Let’s say this time it’s the files in VO_f that were added to the dialogue nodes' Audio Files; to get the male version, we would then set audio_speech_urlPrefix to "../VO_m/".
"../" is a special value that signifies going one folder "up", which in this case means the following will take place:
- get the path added to Audio Files (VO_f/myFile.mp3), then
- go one folder up, then
- go into the VO_m folder to get the file.
You will need to bundle your audio files in a ChatMapper Package file (CMPKG). Files referenced in “Audio Files” will be included automatically, but the gender variant will not; you can force ChatMapper to include it by following the “3D models bundling with ChatMapper” section of the 3D Models guide, as the method is the same. |
SFX
Sound effects can be added only to the dialogue node. They are added by using a new CAF of type File named audio_effect in the dialogue node. We add the audio file to the node and it will be played as soon as the node is triggered.
Ambient
Ambient audio effects can be added to any element such as a location (may not be working), conversation, actor or dialogue node.
They are added by using a new CAF of type File named audio_ambient in the element.
Example of adding audio_ambient CAF for dialogue nodes:
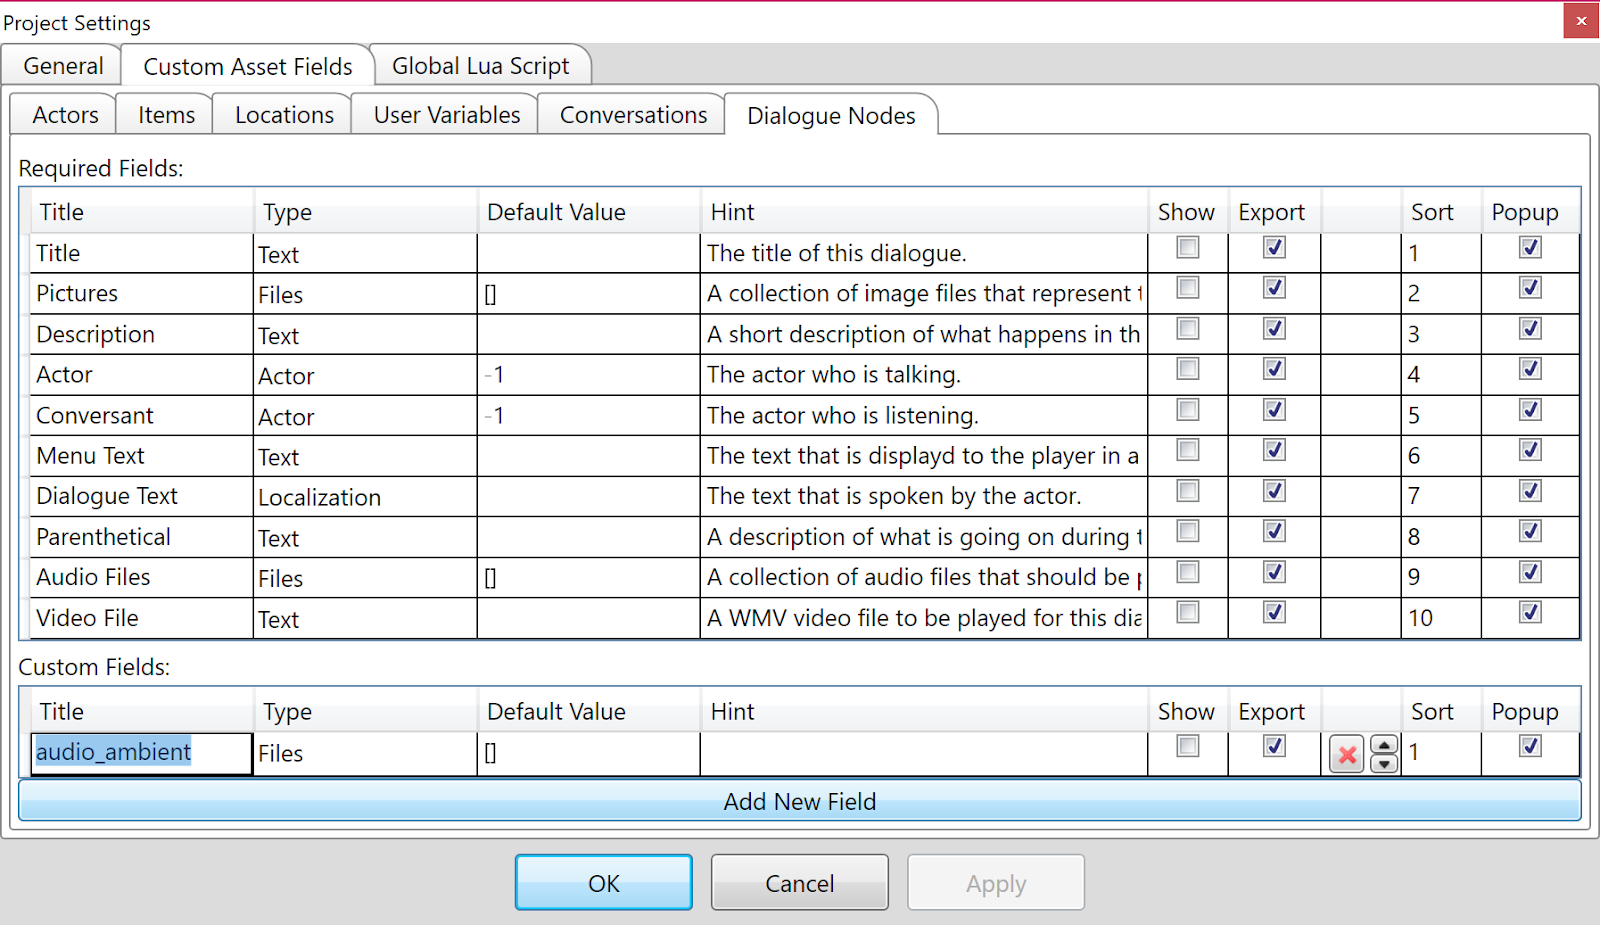
Once the CAF is added the field will appear in the ChatMapper Properties panel.
Note that the CAF name appears as audioambient (without the underscore) instead of audio_ambient, this is only a cosmetic issue.

Click the […] button to select an audio file (typically a .mp3)
To ensure the audio files are included online in the Scenario, be sure to export and upload as ChatMapper Project (.cmpkg) (not .json)
The ambient audio will begin playing when the element is encountered and will continue looping infinitely. When triggering an ambient sound, any currently playing ambient sound will stop and the newly triggered one will play.
You can adjust the volume of the ambient audio through script, volume has a range from 0 to 10.
Example:
LB.audio.setAmbientVolume(3); |
Autoplay
Browsers restrict autoplay of any audio source unless the user interacted with the page in some way first, e.g. with a click or tap.
From version 2.14 onward, if playback fails because the user has not interacted with the page a popup will be shown with a “start” button. The videos will start playing as soon as the user interacts with the page, whether they clicked on the button or dismissed it.

On versions 2.13 and earlier, autoplay of audio is not possible.
© 2021 LearnBrite – Commercial In Confidence
Trademarks & Copyrights are property of their respective owners. Pictures are indicative only & may not reflect final production.
