Photobooth
An area designed for the player to take a selfie for saving the experience, sending to friends or sharing on social media. A photobooth can increase player interaction, facilitate event recall, and add to the overall enjoyment of the experience.

Example space containing a photobooth:
https://app.learnbrite.com/dashboard/spaces/visit/spca4885e7b396bd5888d3cd6
Choose a Background for the Selfie
Find a scenic, or otherwise significant, spot to use as a backdrop for the photo.
Open dev tools, and choose Console
Save the current view as a camera shot
Find an area of the space to place a photo backdrop and add a Mediaboard in the Pencil+ menu
Open dev tools, and choose Console
Save the current view as a camera shot
Adding Hotspots with Avatar Poses
In the Pencil+ menu, choose Add Hotspot
Place the new hotspot in front of the chosen photo background
Select the Settings for a photo pose hotspot (Editing Mode)
Select a Posture for the avatar pose
Set the avatar_lookAt field to “camera”
Set the Custom camera shot field to the camera shot name chosen earlier
Adding a VR Icon for Screen Captures
Add an Icon for the Camera Capture
Select Add icon from the Pencil+ menu
Click the Settings gear on the new icon
Adjust the size of the icon to be easily visible to player in photo pose
Click the Select button next to the Icon field
Uncheck the Is toggle checkbox, if checked
Adding the Screen Capture action to the icon
Click the Settings gear on the new icon
Click the Edit action button next to the On Click field
Click the Trash can icon in the default dialog area to delete
Click the More button, then select Custom Action
Enter the Custom Action into the field
Use the Custom Action that activates the Screen Capture process.
Click the + next to Extra parameters, and enter a parameter “delay” with a value of “1”.
Add a camera shutter sound effect when the icon is clicked
Click the More button, then select Play Sound Effect
Enter the Shutter click sound effect to the URL field
Click Save at the bottom of the Conversation Action Editor
All steps put together should have a result resembling the below
Setting Up the Photo Area
Choose a Background for the Selfie
The photobooth area can either utilize an area of the 3D space or add a mediaboard, with branding, for the photo backdrop.
Scenic Photo Spot (no mediaboard)
Enter edit mode

Find a scenic, or otherwise significant, spot to use as a backdrop for the photo.

Open dev tools, and choose Console

Save the current view as a camera shot
LB.Camera.saveCurrentShot("shot_name"); |

Note: Save the name of the shot in a note. It will be needed later when adding the hotspots.
Classic Photobooth Image Backdrop (Mediaboard backdrop)
Find an area of the space to place a photo backdrop and add a Mediaboard in the Pencil+ menu

The Mediaboard can be a branded piece of marketing for the event, a splashscreen of the space, etc. Size the Mediaboard to a height greater than a player avatar.

Enter edit mode
Select a position to set a camera shot to include the backdrop and the avatar. A bot or other avatar can be utilized to help set up the shot
We recommend a JPG image backdrop of maximum resolution 1024×768 (16:9 aspect ratio) to support 4 to 5 poses in front of it.

Open dev tools, and choose Console
Save the current view as a camera shot
LB.Camera.saveCurrentShot("backdrop_photo"); |

Note: Save the name of the shot in a note. It will be needed later when adding the hotspots.
Adding Hotspots with Avatar Poses
In the Pencil+ menu, choose Add Hotspot

Place the new hotspot in front of the chosen photo background
Repeat to place 4 or more photo pose hotspots.

Select the Settings for a photo pose hotspot (Editing Mode)

Select a Posture for the avatar pose

For more detailed information on Avatar Poses see the Senario Gestures guide |
Set the avatar_lookAt field to “camera”

Set the Custom camera shot field to the camera shot name chosen earlier

Save the new settings

Repeat for each photo hotspot
The posture should be varied for each hotspot. So, if the first hotspot uses “Photo 5”, the others should not repeat this posture. There are currently 8 photo postures to choose from.
Adding a VR Icon for Screen Captures
A VR icon can make the screen capture process easier.
Add an Icon for the Camera Capture
Place an icon next to the photo area, so that the icon can be accessed by the player while their avatar is in a photo pose.
Select Add icon from the Pencil+ menu

Click the Settings gear on the new icon

Adjust the size of the icon to be easily visible to player in photo pose

Click the Select button next to the Icon field

Select the camera icon

New icon will appear in Selected: spot

Click Select

Uncheck the Is toggle checkbox, if checked

Adding the Screen Capture action to the icon
Click the Settings gear on the new icon
Click the Edit action button next to the On Click field

Click the Trash can icon in the default dialog area to delete

Click the More button, then select Custom Action


Enter the Custom Action into the field
Use the Custom Action that activates the Screen Capture process.
Note: Custom Action is functional in version 3.0+
UI.takeScreenshot |
Click the + next to Extra parameters, and enter a parameter “delay” with a value of “1”.

UI.takeScreenshot
delay
1
Click Add action

Add a camera shutter sound effect when the icon is clicked
Click the More button, then select Play Sound Effect

Enter the Shutter click sound effect to the URL field
https://cache.learnbrite.com/_assets_/audio/shutter.mp3

Click Add action
Click Save at the bottom of the Conversation Action Editor

All steps put together should have a result resembling the below

When icon is clicked, a screen capture, like the example below, will be saved to the player’s device.

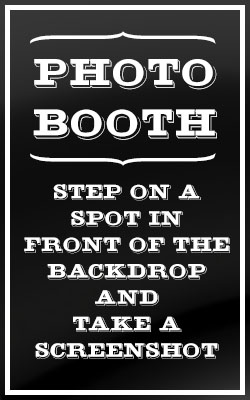
Add Instructions Poster
https://cache.learnbrite.com/_assets_/img/photosign.jpg

