Create conversational experiences with characters, bots and avatars in VR / AR / 3D / 360 across devices and platforms with Rasa and LearnBrite. Have fun!
Jump to:
RASA / LearnBrite Character Conversational Experiences
Before you start (requirements)
Installation of Rasa and RasaX
Launch and shutdown of Rasa and RasaX
Install an SSL certificate in order to connect to Rasa using HTTPS
Request activation of the Rasa Gateway for your space
Using Rasa for ChatMapper choices
Showing both speech recognition and text choices
I get an error (“CORS error”) in the developer tools when a request is made to my webhook
I want to have speech recognition, but also show clickable choice buttons
RASA / LearnBrite Character Conversational Experiences
Rasa, combined with LearnBrite, can build fully autonomous AI driven avatars. Build a sales bot, advice bot, info bot or companion bot. Connect your Rasa AI agent to a LearnBrite avatar and begin talking to it. Just follow this tutorial. A little Javascript knowledge is handy.
Before you start (requirements)
This tutorial assumes you already understand and are knowledgeable with setting up and building your own RASA chatbot and deploying an instance. RASA is open source software for building online contextual chatbots and AI assistants. Build your own chatbot now. https://rasa.com/docs/rasa/ Need help? Visit https://glasir.ai to get hired help and get started quickly.
Example server setup with AWS
Setup AWS EC2 instance
NOTE: standard storage is not sufficient – Costs are upwards of US$50 – US$60 per month
# minimum instance type: t3a.large
# minimum storage (to be selected during instance creation): gp2 100 GiB
- Login to your AWS Console – https://aws.amazon.com/developer/
- Navigate to EC2 Instance and click "Launch Instance"
- Select Ubuntu Server 20.04
- Select General Purpose t3a.large
- Select "Configure Instance Details"
- Select "Next: Add Storage"
- Select Volume Type: General Purpose SSD (gp2)
Size (GiB) 100 - Click "Next: Add Tags"
- Click "Next: Configure Security Group"
- Add the following security groups.

- Click "Review and Launch"
- Click "Launch"
- Select an existing key pair or create a new key pair.
- Click "Launch Instances" Note: Cost is minimal for 1st week.
- Click "View Instances"
- Click your "Instance ID"
- Click "Connect" Navigate to "SSH Client" Tab and follow connection instructions
Once you have connected to your server via terminal follow the next steps to setup Rasa.
Installation of Rasa and RasaX
Enter following commands into terminal
1. Connect to SSH Amazon Ubuntu instance
ssh -i "YOUR-AMAZON-KEY.pem" YOUR-AMAZON-INSTANCE |
2.
sudo curl -sSL -o install.sh https://storage.googleapis.com/rasa-x-releases/0.31.5/install.sh |
3.
sudo bash ./install.sh |
Follow any prompts
4.
cd /etc/rasa |
5.Install python3 if not installed
sudo apt install python3 |
6. At this point both Rasa and RasaX should be active on the AWS instance and the RasaX console should be reachable at http://YOUR-SERVER-IP/login
This is then the moment to:
- log in to RasaX using the instance ip address followed by /login
- set up the link to a Github repository
- upload a trained rasa model file or train a model using the RasaX menu
- Use this test model in your own git repository: https://github.com/R1ftwarr/rasatestbot
NOTE 1: the RasaX web interface has some refresh issues, so after connecting a repo it might be necessary to refresh the browser
NOTE 2: in order to enable the REST API for Rasa, log to the instance and edit credentials.yml adding the following line if not already present:
rest:
7. Save the file and restart the containers with:
sudo docker-compose down |
Launch and shutdown of Rasa and RasaX
The AWS instance can be stopped and reactivated depending on usage.
In order to stop or launch the Rasa components the AWS instance must be active and login from a terminal is required.
After logging in:
cd /etc/rasa # Start Rasa and leave control to the terminal (-d = detached) # Shut down Rasa |
NOTE: Run before creating SSL certificate
Install an SSL certificate in order to connect to Rasa using HTTPS
The AWS instance must be active and login from a terminal is required. After logging in:
sudo apt install certbot |
NOTE: Choose option 1. And spin up a server
sudo ls /etc/letsencrypt/live/<YOURDOMAIN.COM>/privkey.pem |
Setting up the 3D environment
Create a Space

Enable Speech


Add Bot to Space
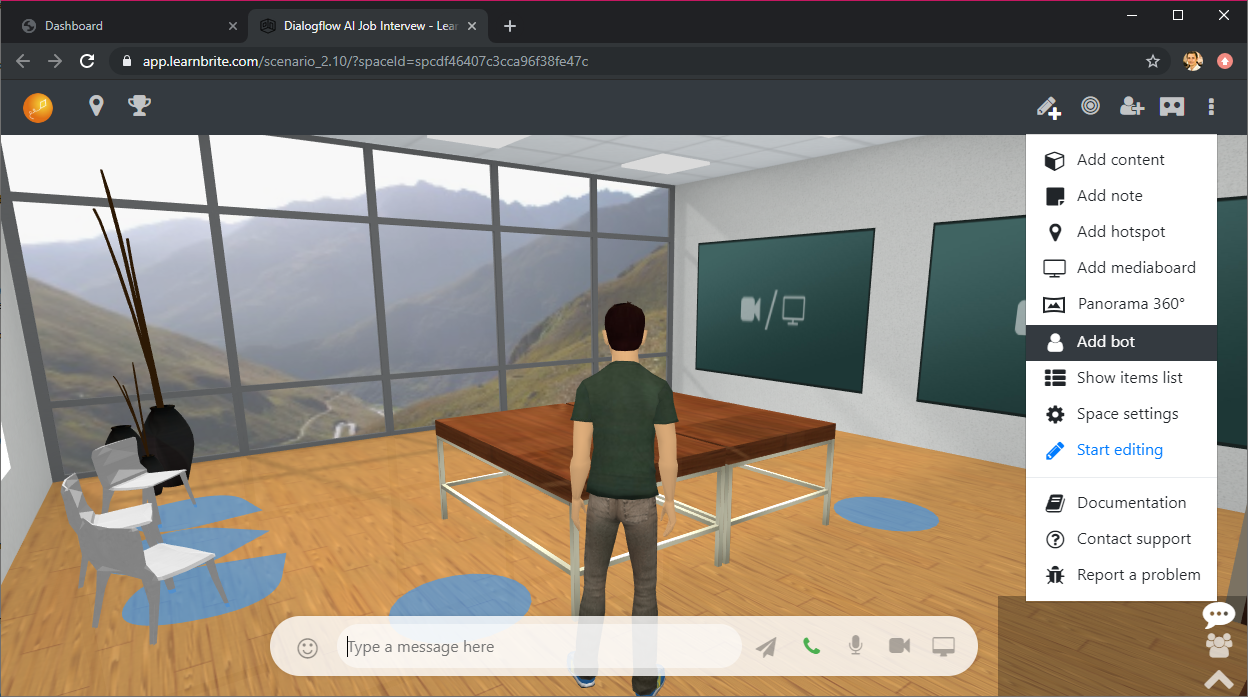


Click the cog/settings icon above the bot. Copy the avatar_externalid and save it . This will later be added to “YOUR_AVATAR_EXTERNAL_ID” code snippet. Close the window.

Click the conversation icon above the bot

The conversation editor will appear. Click the More button near the bottom, choose the Script action under General.

Paste the following code in the Script field (adjusting to match your avatar_externalid)
var rasaUrl = "YOUR_RASA_ENDPOINT_URL"; var botId = "YOUR_AVATAR_EXTERNAL_ID"; LB.Actions.pauseDialog({executedFromEA:true}); setTimeout(function(){ LB.uiController.choices.create([{id:0,text:"Cancel"}], "Speak now", LB.uiController.choices.remove); LB.cmPlayer.speechRecognition.srStart_listenForCommand(function(data){ LB.uiController.choices.remove(); startRasa(data.results[0][0].transcript, botId, rasaUrl); }); },100); |

Click the Add action button and Save button.
NOTE: Remove any other action in your conversion path except the script action.
Request activation of the Rasa Gateway for your space
Contact LearnBrite support providing the URL to your space requesting for Rasa Gateway to be added to your space. They will add the gateway script to your space,
https://cache.learnbrite.com/_assets_/partners/rasa/rasa.js
NOTE: This script assumes that your Rasa Url endpoint will return an reply object array formatted like this:
[{"text": "First text reply"}, {"text":"Second text reply"}] |
The text of the last reply from wit.ai is also stored in a variable called Rasa_LastReply. This variable is available across the various access methods, e.g.
// In a script |
You’re done!
Once support has added the script you can then open your space, click your bot and talk to it. Your bot will respond however you built your Rasa assistant. Have fun!
Using Rasa for ChatMapper choices
Getting input from the user is easy, but the true power of the speech recognition comes from integrating Rasa with ChatMapper’s branching conversations!
Add the following snippet to the parent of your choices:
var rasaUrl = "YOUR_RASA_ENDPOINT_URL"; var botId = "YOUR_AVATAR_EXTERNAL_ID"; LB.Actions.pauseDialog({executedFromEA:true}); setTimeout(function(){ LB.uiController.choices.create([{id:0,text:"Cancel"}], "Speak now", LB.uiController.choices.remove); LB.cmPlayer.speechRecognition.srStart_listenForCommand(function(data){ startRasa(data.results[0][0].transcript, botId, rasaUrl); }); },100); |
The answer of the Rasa speech recognition is saved to the variable Rasa_LastReply, which you can use as a condition in ChatMapper, e.g.:
Variable["Rasa_LastReply"] == "pizza" |
To use it as a condition, you can therefore organize your nodes as follows:

Showing both speech recognition and text choices
This is possible but requires additional configuration.
In the parent node of your choices (i.e. the node from which the choices branch out), add the following script:
var rasaUrl = "YOUR_RASA_ENDPOINT_URL"; var botId = "YOUR_AVATAR_EXTERNAL_ID"; |
After you pasted the snippet in ChatMapper, you should paste in your Rasa URL and the ID of the bot which will speak the answer (if any) as well as fill in the “choices” variable, which currently looks like this:
var choices = [ |
You might have noticed that the choices have a specific format:
{id: <ChatMapper node ID>, text: "<Text that appears on the button>"},
- Each choice line is wrapped by { }, and ends with a comma
- The ID is a number (the Cancel button has a special ID, 0)
- The “text” part is wrapped in quotes
Missing any of these will probably result in the choices not working. You can of course add as many choices as you want, for example the following will show 4 buttons (including Cancel).
var choices = [ |
To make choices progress with speech recognition as well, see the section on Using Rasa for ChatMapper choices.
FAQs
I get an error (“CORS error”) in the developer tools when a request is made to my webhook
This is due to the CORS (“Cross Origin Resource Sharing”) policy set on your server. Amazon automatically provides the correct response headers to enable cross-origin requests, if you are hosting Rasa/RasaX on your own server you must be sure to enable them as well, see: https://developer.mozilla.org/en-US/docs/Web/HTTP/CORS#the_http_response_headers
How to use speech recognition and clickable choice buttons at the same time
See the “Showing both speech recognition and text choices” section.
